
QUIKTEL QUIKPAGER User Guide
1. Getting Started
- Remove paper from battery clip and rotate battery to ensure contact.
- Power QUIKPAGER on. Confirm LONG beep and self-test Logo screen. Confirm it says V3.0 or V3.1. Press Exit to go to Main Screen.
- Unplug and plug back confirming SHORT beep for battery activation.
- Type @CLEAR 1234. Press Enter and then press Y. Press Exit to go back to the main screen.
2. Setting up Paging Companies
- Type @SERVICE. Press Enter and press Y.
- Press 1 for Service Directory.
- Enter the name of your Paging Company. Press Enter.
- Enter the paging terminal phone number provided to you by your paging company. If you are behind a PBX, you will need to enter "9," before the phone number. ie: 9,1-800-555-3232. Press Enter.
- Type 2400, 1200 or 300 baud rate. Press Enter.
- Enter a secondary/alternate paging terminal phone number. If no alternate, leave blank and press Enter.
- For Parity, press Enter. (Selection is EVEN).
- For Bits, press Enter. (Selection is 7).
- Enter the maximum number of characters per message. Press Enter.
- For V3.0 only - For date and time stamp sent with messages, press C to toggle from No to Yes. Press Enter.
- Press Exit several times to go back to the main screen.
- Repeat section 2, for additional Paging Companies.
3. Programming Contacts
- From the main Screen, type !CONFIG. Press Enter.
- Press 1 and program date. Press Enter.
- Press 2 and program time in 24 Hours, military clock. Press Enter.
- Select 1 for 12 hours clock for AM or PM display. Press Enter.
- Press Exit several times to go back to the main screen.
- From the main Screen, type !CONFIG. Press Enter.
- Select 3 to program contacts.
- *Enter the first and last name of person. Press Enter.
- Press Y to add to Directory.
- The name of your Paging Company (Service = Name) will appear in the upper right corner. To select a different paging company from your service directory, scroll with NEXT/PREV. Press Enter to accept.
- Enter pager PIN or ID number, without any hyphens, dashes or spaces. Press Enter.
- Press Enter for Logbooks = NO.
- Press Enter for Groups = NO.
- To enter additional contacts, repeat from the *. Note the counter in the upper right corner, showing the number of contacts in the QUIKPAGER directory.
- After all contacts have been entered, press Exit until back to Main Screen.
4. Sending Messages
- From the main screen, type a few letters of the first or last name of the person, or group, you wish to page. Press Enter. QUIKPAGER will find matches. Press NEXT or PREV to scroll and select. Press Enter.
- Select M=Message.
- Type your message. If text is long, QUIKPAGER will automatically go to next page. Use NEXT and PREVIOUS to review or edit text.
- Press Enter to send.
- Messages can be continuously entered while QUIKPAGER is dialing, connecting and sending messages or printing. There is no need to wait to enter more messages or obtain printouts.
5. Programming Scheduled Messages
- From the main screen, type a few letters of the first or last name of the person, or group, for whom you wish to schedule a message. Press Enter. QUIKPAGER will find matches. Press NEXT or PREV to scroll and select. Press Enter.
- Select S=Scheduled and type the month, date, year and time in 24 hours clock. Press Enter.
- Type text of message and press Enter.
- Create as many scheduled message as needed.
- Scheduled messages are transmitted automatically.
6. Viewing Messages
- From the main screen, type a few letters of the first or last name of the person whose stored messages you wish to view. Press Enter. QUIKPAGER will find matches. Press NEXT or PREV to scroll and select. Press Enter.
- Select V=View to see the stored messages. The upper corner will display the number of messages in memory for that contact.
- Press NEXT, and scroll using NEXT or PREV. Hold down the "Ctrl" key and press E to go to last message.
7. Re-send or Cancel a Message
- From the main screen, type a few letters of the first or last name of the person, or group, whose message you wish to re-send or cancel. Press Enter. QUIKPAGER will find matches. Press NEXT or PREV to scroll and select. Press Enter.
- Select V=View to see the stored messages. The upper corner will display the number of messages in memory for that contact.
- Press NEXT, and scroll using NEXT or PREV. Hold down the "Ctrl" key and press E to go to last message.
- Hold down the "Ctrl" key and press T. QUIKPAGER will ask if you want to Re-Send or Cancel. Press Y. An X for pending or a c for canceled will appear at the extreme left corner indicating the status.
8. Programming Canned Messages
- From the main screen type !CONFIG. Press Enter.
- Press 7 for Function Keys.
- *Press 1 to set the canned message for Function Key F1. Press Enter.
- Enter the text of the canned message for F1. Press Enter.
- Repeat from * for Function Keys F2 to F6
9. Creating Groups
- From the main screen, type !CONFIG. Press Enter
- Press 4 and type group password CMX741209. Press Enter
- Enter a name to identify the Group. i.e.: SALES. Press Enter./li>
- Press Y. Press 2 to Edit List.
- * Type Name of contact you wish to add to your Group. Press Enter.
- Use NEXT or PREV to select the correct name. Press Enter to accept.
- To add more names, repeat from *. Press Exit until you return to the main screen.
10. On-line Logbook
-
No programming is required. Messages sent are automatically stored in the On-Line Logbook, each with a preset life of 3 hours. See Section 4, Red Manual for information on ON-LINE and USER LOGBOOKS.
11. Creating User Logbooks
-
Create USER Logbooks to permanently store 300 sent messages for viewing and chronological printing by Name. Messages must be printed to be deleted from memory. Sent and pending scheduled messages will also be printed in the reports.
- From the main screen, type !CONFIG. Press Enter.
- Press 6 for Printer selection.
- Press Enter for Logbook Printer. Press C to toggle to YES. Press Enter.
- Press 5 for Logbook Directory selection.
- Type a name to identify the Logbook. i.e.: SERVICE. Press Enter.
- Press Y.
- *Press 2 to Edit List.
- Type Name of contact. Press Enter.
- Use NEXT or PREV to select the correct name. Press Enter. To create additional logbooks, repeat from *. Press Exit until you get back to Main Screen.
12. Printing User Logbooks
- From the main screen, type !PRINT.
- Press 1.
- Use NEXT/PREV to select USER Logbook. Press Enter.
- Check that printer is connected. Press Y. More messages can be sent during printing. Wait for a few minutes after printer stops to ensure complete printing is finished.
13. Deleting Messages in User Logbooks
-
Messages must be printed before they can be deleted. For instructions on printing, see Section 12. Printing User Logbooks.
- From the main screen, type !PRINT.
- Press 3.
- Use NEXT/PREV to select name of USER Logbook. Press Enter.
- Wait for a few minutes while QUIKPAGER is deleting. Press Exit until you get back to Main screen.
14. On-line Printing
- From the main screen type !CONFIG. Press Enter.
- Press 6 for Printer selection.
- For On-Line printing, press C to toggle to YES. Press Enter.
- Press Exit to get back to Main Screen.
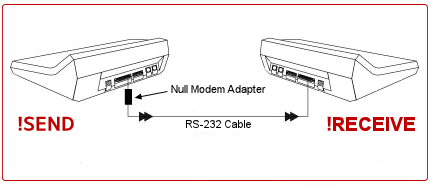
15. Cloning Using a Cable
-
Ideal for QUIKPAGERs that are in close proximity. It only takes 3 minutes to transfer programming from one programmed QUIKPAGER to another, via the RS-232 port.
- Remove all programming from the "receiving" QUIKPAGER. From the main screen, type @CLEAR 1234. Press Enter and then press Y. Press Exit to go back to the main screen.
- Interconnect QUIKPAGERs using a 9 pin, RS-232 cable and a Null Modem Adapter. See Figure diagram.
- Receiving QUIKPAGER: from the main screen type !RECEIVE and press ENTER. DO NOT press Y yet.
- Sending QUIKPAGER: from the main screen type !SEND and press Enter.
- Press Y in sending QUIKPAGER AND IMMEDIATELY AFTER, press Y in receiving QUIKPAGER. If "++++" does not appear on screen within 20 seconds, press Exit and repeat this section.
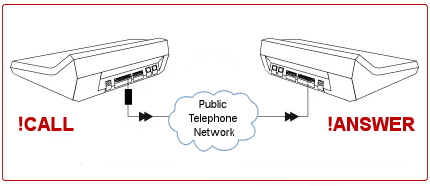
16. Cloning Over a Telephone Line
-
Ideal for QUIKPAGERs that are far away from each other. It only takes 3 minutes to transfer programming from one programmed QUIKPAGER to another, over a telephone line.
- Remove all programming from the "answering" QUIKPAGER. From the main screen, type @CLEAR 1234. Press Enter and then press Y. Press Exit to go back to the main screen.
- From the main screen, type !ANSWER in "answering" QUIKPAGER and press ENTER.
- Press Y. "Waiting for call" will be displayed.
- Type !CALL in "calling" QUIKPAGER and press Enter.
- Enter the telephone number of the "answering" QUIKPAGER. Press Enter. If "++++" does not appear on screen within 45 seconds, press Exit and repeat this section.
17. Dual Configuration Set-up
-
Use only ONE phone line and (2) QUIKPAGERs for CONTINUOUS and SIMULTANEOUS typing and transmission of messages.
- Designate Master and Auxiliary QUIKPAGERs.
- First program Master QUIKPAGER.
- Connect telephone line (and optional printer) to Master and test sending Messages.
- Prepare Auxiliary following Section 1: Getting Started.
- Clone Auxiliary QUIKPAGER (Receiving) from Master (Sending) by following Section 15: Cloning Using a Cable. Leave interconnection as shown in diagram.
- From the main screen on the Auxiliary QUIKPAGER, type !AUXILIARY and press Enter. Press C to toggle to QUIKSERVER = YES. Press Enter. Messages typed in Auxiliary will be sent to Master over the RS-232 connection. Messages sent from, both, Auxiliary and Master QUIKPAGERs will be stored in the memory in the Master QUIKPAGER.
18. Turning Off the Sound
- From the main screen type @SOUND.
- Press C to toggle to SOUND = NO. Press Enter.
19. Sending messages to an on-site paging terminal
- Connect QP2400 to the paging terminal using an RS-232 cable, direct pin-to-pin, 9-pin D connector. In QP2400's RS-232 9-pin Connector, PIN 2 is OUTPUT, PIN 3 is INPUT and PIN 5 is GROUND.
- Set your paging terminal to communicate at 2400 baud,8,N,1.
- In QP2400, in main screen, type @SERVICE, and then press enter.
- Press Y to accept.
- Press 1 for Service Directory
- Type QUIKSERVER and then press enter.
- Press Y to accept.
- Type 200 for the length of the message. Press enter.
- Press the Exit key, twice, to go back to the main screen.
- In Main Screen type !CONFIG. Press Enter.
- Select 3 to program Names.
- Type first and last name of person (no numbers). Press Enter.
- Press Y to accept.
- In the upper right corner of the keyboard, press the NEXT key to select Service=QUIKSERVER. Press enter.
- Enter the pager ID number. Do not put in a hyphen (-) or leave a space in front of or within the number. Press Enter.
- Press Enter, twice, to get to the screen to enter the next name. Or press the Exit key until you return to the main screen.
To program names:
 Press Enter after each selection or command.
 - Press Exit to go back to previous screens.
- Press Enter to accept a default setting.